Acumatica Import Scenario - Importing Attributes

Acumatica Attributes are type of pre-defined custom fields that users can utilize in capturing data, validating or storing information across Customers, Vendors, Inventory and various other data entry screens such as Leads, Opportunities, Projects, AP, AR etc.

There are 5 different attribute types that you can store data in Acumatica
  1. Text: A text box into which the user can type text (Control Value 1)
  2. Combo: A list box users can use to type or select options (Control Value 2)
  3. Not available :)
  4. Checkbox: A check box users can select or clear (Control Value  4)
  5. Datetime: An element for selecting date and time (Control Value 5)
  6. Multi Select Combo: A list box where users can select multiple options (Control Value 6)

You can manually configure each attribute by navigating to Configuration --> Common Settings --> Attribute screen and create attributes if they are fewer to keyin, however if you have large set of attributes that you would like to collect across different entities then your better off creating them in spreadsheet and then importing through an Import Scenario.

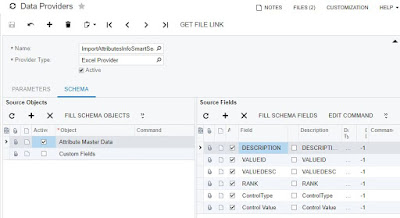
Step 1: To create an Import Scenario navigate to System --> Manage --> Data Providers, create a new
data provider with provider type as Excel Provider (PX.DataSync.ExcelSYProvider), load the file and populate the Schema source object and fields.

Step 2: Create a new Import Scenario, pick the data provider created and the sheet to process, map the spreadsheet fields with Acumatica fields to process the import process of the data to create new attributes/records.

Step 3: Create a new Import by Scenario process and prepare the data and import, and you just loaded attributes, its values and sort order.

The benefit of importing data allows you to create attributes in spreadsheet as master sheet and you can repeat the process of importing on other instances, comes in handy during testing & go live imports makes your implementation process easier.

Comments

Popular posts from this blog

Acumatica Snapshots - Uploading and restoring large files

In Acumatica ERP, you can create company snapshots containing your company’s full or partial data. Snapshots that can be saved locally in the same database, or at a specified location. You can import and restore snapshot to another company, in this case test company, it's pretty handy tool very useful during implementations, customization and support/troubleshooting while you work with data. You will occasionally run into few technical issues with snapshots, the newer version now needs you to keep all users logged out and in maintenance mode to take snapshot, link to blog article here. Today we are going to discuss how to export and import snapshots which are larger in file size of above 1GB, this is not a limitation from Acumatica and more to do with constraint and default value set in IIS (Internet Information Server). IIS by default allows uploading of a file size of 1GB and it limits the upload process and it can be tweaked to upload upto 4 GB file size and that's

Acumatica Statements Generation - On Demand

Version 6.0 Statement Cycles - Acumatica statement cycles in older version were bit rigid in operation and found it very hard to use for various scenario's We found the latest enhancements to Acumatica statement generation to be very practical solution based on customer feedback to improve the generation of statement based on their needs. 2017 R2 In the latest version 2017 R2 users now can define their statement generation cycle and not restricted to just 3 options, the new version provides with options to do "Weekly", "Twice a Month" or "End of Financial Period" allowing users to select based on their statement cycles. This flexibility allows user to configure to various scenarios and leads into another feature "On Demand" statement generation. On-Demand Statement -  in order to generate on demand statement navigate to AR module, pick a customer and from Action menu select Generate Statement on Demand as shown in the sc

Acumatica User Defined Fields/Values - UDF using attributes in 2018 R2

In 2018 R2 version Acumatica introduced new feature called "User Defined fields" in short UDF's. These fields allow users to configure existing document screens to capture custom data per document basis. New features like this really helps partner/customer to configure business workflow process, this capability built on a framework can now enhance existing documents like Sales order, purchase order or other document to collect custom data at transaction level using attributes. For more information on which documents/screens you can collect UDF's refer to Acumatica help  In this example I have created few custom data that we would like to accept in our Print industry, this works pretty well with our Acumatica plugin PrintShop for Screen printing and embroidery companies, as business do accept different type of data and allows us to do minimal customizations. If your accepting custom data related to art work, then you can create those attributes ahead of